Tampilkan postingan dengan label TUTORIALS. Tampilkan semua postingan
Tampilkan postingan dengan label TUTORIALS. Tampilkan semua postingan
Minggu, 24 April 2011

Cara Membuat Blog dengan Blogger.com
Sebelum anda langsung praktek membuat blog sebaiknya anda simak dulu video cara membuat blog berikut ini:
Langkah-langkahnya adalah sebagai berikut:
- Pada address browser anda ketik http://blogger.com
- Setelah itu akan tampil seperti terlihat pada gambar dibawah ini:
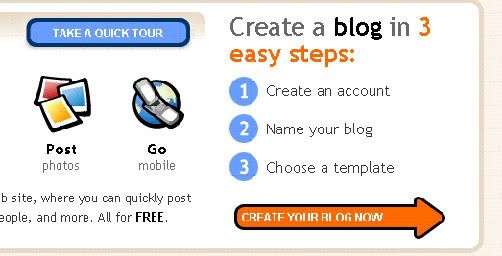
- Klik CREATE YOUR BLOG NOW.
- Tunggu sampai muncul tampilan seperti berikut ini:
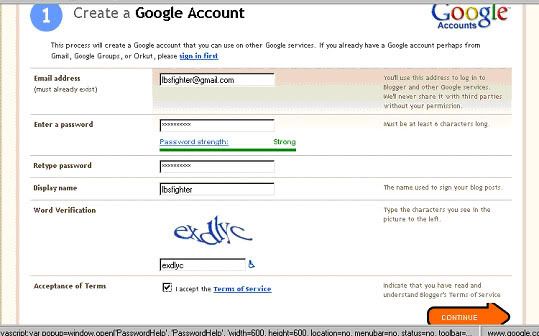
- Email address => di isi dengan alamat email kita (sebaiknya pake alamat email di gmail.com).
- Enter a Password => di isi password anda
- Retype Password => di isi dengan password yang sama dengan yang di atas.
- Display Name => di isi dengan nama kita (ini akan ditampilkan pada blog anda nantinya)
- Word Verification => isi persis sama dengan tulisan yang diatasnya, huruf besar ditulis dengan huruf besar gitu sebaliknya.
- Klik/centang pada “I Agree the Term Service”.
- Setelah itu tekan tombol Continue.
- Selanjutnya muncul tampilan seperti berikut ini:
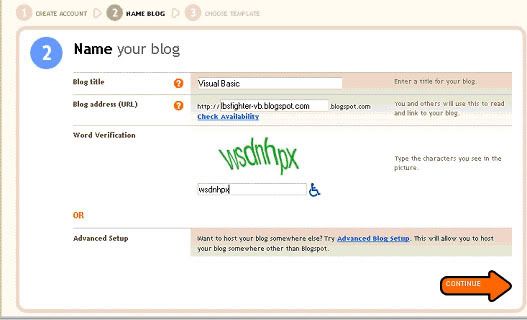
- Blog Title => di isi dengan judul dari blog kita, posisinya ada pada header (bagian atas blog/pada bagian atas browser anda)
- Blog Address (URL) => untuk ini bisa anda buat sendiri, misalnya seperti punya saya http://overgrown-hell.blogspot.com. Utuk URL saya cukup dimasukkan lbsfighter pada input text, tentunya untuk URL anda lain lagi.
- Word Verification => anda isi persis sama dengan kata yang ditampilkan dibawahnya, karena klo salah tidak akan bisa melanjut kelangkah berikutnya.
- Jika semua sudah benar anda akan melihat seperti pada tampilan berikut ini:
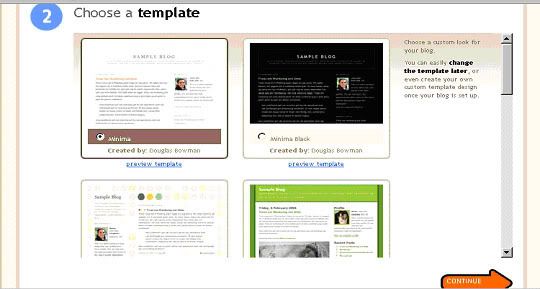
- Sekarang kita memilih template yang disediakan oleh Google, sebaiknya sebelumnya ada baiknya kita mem-Preview dulu sebelum melanjutkan kelangkah berikutnya.
- Jika sudah cocok dengan templatenya tinggal di klik Continue.
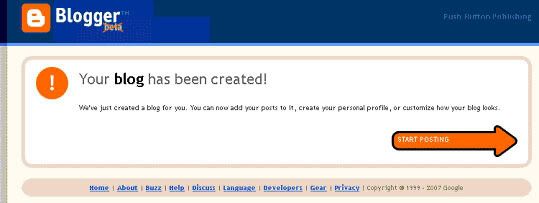
- Langkah selanjutnya anda tekan tombol Star Posting, untuk melakukan posting pada blog anda.
Sabtu, 23 April 2011
Efek HDR (High Dynamic Range) (Photoshop Tutorial)
HDR atau High Dynamic Range photography banyak dijumpai di web-web tukang foto. Hasilnya sih keren banget.. cuman aku juga gak tau persis apa tu HDR dan gimana bikinnya kalo pake camera. Susah kayaknya.. Tukang photo pemula kayak aku bisanya cuman edit lewat photoshop doang.. hehehe.. HDR ini juga aku dikenalin oleh temen, dia minta tutorialnya.. ya udah aku coba bikinin deh.. mudah-mudah an mirip-mirip gambar HDR… hehehehe
Pertama buka gambar yang mo di edit .

Menurut saya langkah yang kedua ini sangat penting dalam pembuatan HDR Image, yaitu setting shadow dan highlight nya .. Klik Image >adjustment> shadow/highlight. Setting seperti dibawah :

Terus tekan CTRL + J untuk duplikat layer background, ganti layer efek dengan color dodge.

Duplikat layer 1 dengan tekan CTRL+J trus ubah layer efek nya menjadi linear burn.

Ubah forground color menjadi Hitam dengan tekan tombol X. Lalu klik Select > Color Range, ubah fuzziness menjadi 100. Setelah klik OK Klik Layer mask , maka muncul Layer mask di samping layer 1 copy tadi.

Karena gambar kurang oke, terlihat ada noise hitam, klik Filter > blur > gaussian Blur.

Duplikat layer 1 copy dengan menekan CTRL+J. ganti layer efek menjadi Overlay dan tekan CTRL+I untuk Inverse atau membalik warna layer mask.
Sekarang ubah Foreground menjadi putih dengan tekan tombol X di keyboard. Lalu klik Select>color range. fuzziness tetep 100.


Setelah di OK , lalu drag background ke create New Layer, setelah duplikat lalu pindahkan layer background copy ke paling atas , seteleah itu klik Create Layer Mask. maka muncul layer mask baru seperti ini :

Klik filter > blur > gaussian blur untuk menghilangkan Noise.

CTRL klik di layer mask background copy untuk menyeleksi layermask, lalu Klik Adjustment layer > Gradient map.

Setting Gradient map seperti dibawah :

Kalo udan klik layermask yang terbentuk, lalu tekan CTRL +I untuk Inverse selection.

Ganti Layer efek menjadi Hard Light. kamu bisa atur Opacity nya juga terserah aja..

Sekarang kamu bisa ke layer background dan atur hue dan saturation nya.. Hasilnya kayak gini :

Saya coba ke gambar lain , hasilnya begini :

HDR nya :

ada lagi :

HDR nya :

lagi nih :

HDR nya

satu lagi nih :

HDR nya :

Selamat Mencoba yaa…
Jumat, 22 April 2011
Easy Arm Amputation (Photoshop Tutorial)

To amputate a friends arm all you need is a camera, a raw chicken thigh, Photoshop and this straight-forward tutorial.
To begin you will need 3 separate photo’s all of which are taken at a similar time, with the same camera.

In the first photo the arm is resting on a bed with the camera focused on the elbow.

The second photo is taken from the same position but without the arm. So ask the subject to move out of frame, taking care not to disturb any of the creases on the sheets.

In the third photo we have an uncooked chicken thigh placed on a light-coloured plate. A knife has been used to rough up the skin around the end a little, and the camera is focused on this area.
(Remember to wash your hands TWICE after handling raw poultry!)

Now, in Photoshop open up the first image of the arm, then place the ‘no arm’ image on top. Reduce it’s opacity to around 50% and line it up with the image beneath, adjusting the scale if necessary.

Add a layer mask to this layer.

With the layer mask selected use a large black brush to mask out one side of the layer.

Now adjust the brightness/contrast so that it matches the layer beneath. When you have finished, delete the layer mask.

Use the crop tool to resize the image, leaving only the area where the arm will be.

Now open up your chicken image.

Use the Quick Selection tool to make a selection around the chicken thigh.

Take more care around the front area, the area towards the back will not be used.


Now paste your chicken into a new layer above your arm layer, and adjust the scale so it matches the arm.

Select your arm layer and create a layer mask.

In the layer mask use a large 0% hard black brush to mask out the rest of the body above the elbow, revealing the layer below.

Now move the arm layer so that it’s positioned above the chicken layer.

Go back to the arm layer mask and this time alternate between a small soft eraser and small soft black brush to blend the area where the chicken joins the arm.

Next click on the button shown above and choose Brightness/Contrast to create an adjustment layer above the chicken layer.


We only want these adjustments to affect the chicken layer, so right click on the adjustment layer and choose ‘Add clipping mask’.

Now you can adjust the brightness and contrast of the chicken.

By bringing the contrast up and the brightness down the chicken will appear a little redder.

Next add a color balance adjustment layer, again with a clipping mask.

Adjust the sliders so that the skin of the chicken is a similar colour to the skin of the arm.

Now your arm and chicken should be blended seamlessly together.
Next we need to add some shading to the sheet below the chicken. Select the bottom layer and choose the Dodge tool.

Use the Dodge tool set to Midtones and 15% Exposure to darken the area where the chicken rests on the bed.
Finally we will add two more adjustment layers above all the other layers.
First a Levels adjustment layer.

In the Levels dialog box use the black colour picker to choose the darkest part of your image, the grey one to choose an area of grey in your image, and the white colour picker to choose the lightest part of your image.

And then add a Black and White adjustment layer.

The default settings should work fine.

Change the layer’s blending mode to Overlay, and reduce its opacity to 50%.
And that’s it, have fun!
Langganan:
Postingan (Atom)
